1. Material and Colour characteristics
Surface Finishing Guidelines
HIMACS sheets are factory-sanded prior to being covered with a protective film. This high-quality factory finish reduces the amount of final sanding required by fabricators, whether in the workshop or on-site.
However, the factory finish is not intended to serve as the final surface. All visible surfaces of the finished product must be properly sanded and/or polished by the fabricator or installer.
Please note that the recommended standard finish for HIMACS sheets is a semi-gloss finish. A high-gloss finish may also be applied, but it is best suited for artistic applications or installations that are not subject to frequent handling.
Avoid overstating the performance of any finish, especially when working with darker colours or satin/gloss finishes. For instance, dark or black colours are not recommended for a matte finish, as they tend to show fingerprints and oil marks from hand contact.
Important Note
Dark or richly coloured patterns require more meticulous and time-consuming finishing compared to lighter tones to achieve satisfactory results across all finish types. Therefore, it is essential to consult with and obtain agreement from the client during the project planning stage.
Additionally, as the gloss level increases through sanding and polishing, these patterns may exhibit more noticeable colour variation. For this reason, a low-gloss (matte) finish is strongly recommended for such designs. High-gloss or gloss finishes are not advised.
If a high-gloss or gloss finish is nonetheless selected, it is crucial to ensure that all sheets used originate from the same production batch and have closely matching production numbers to minimize visual inconsistencies.
High-gloss finishes, regardless of colour, are not recommended for surfaces in high-traffic or high-use areas, such as countertops, as they are prone to visible wear and scratching and require ongoing maintenance.
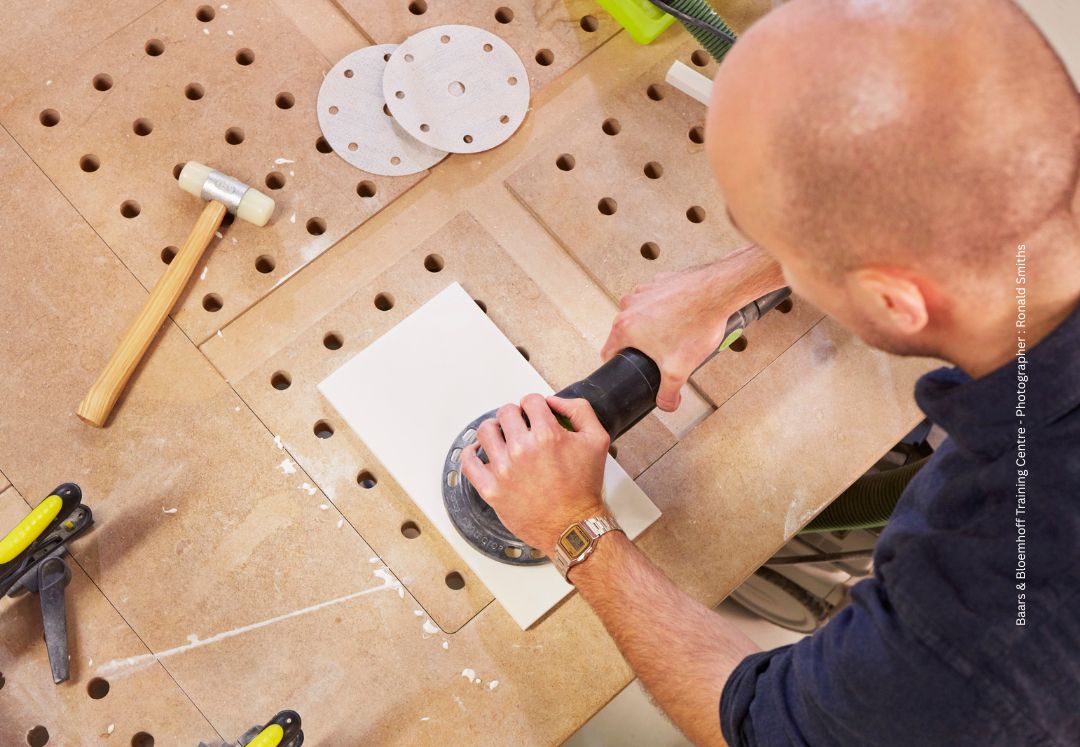
2. Tools and Machines
Sanding Equipment and Techniques
The best finishes are typically achieved using a random orbital sander powered by either air or electricity.
In most cases, a sanding pad with a diameter of 150 mm is used, as sandpaper discs of this size are widely available on the market. For larger surface areas, it is advisable to use the largest sanding pad available—up to 500 mm or 600 mm in diameter—when working with handheld machines.
Extensive sections of HIMACS sheets can be sanded using a wide belt sanding machine equipped with at least three belts in a row. This method allows for more accurate estimation of fabrication and labour costs.
Avoid using a handheld belt sander, as it generates excessive heat which may compromise the integrity of the seam. Additionally, belt sanders are highly aggressive and can remove material too quickly, potentially causing fabrication issues if more material is removed than intended.
For specialized applications or specific fabrication processes, wet sanding may be preferable, as it helps to reduce and control dust more effectively. Ensure that all equipment used is waterproof or water-resistant, and that water is used in an environmentally responsible manner—ideally with a recycling system.
Dust control is always recommended during any sanding operation.
3. Sanding Techniques For High Quality Results
The quality of the finish may vary depending on the skill of the operator. Achieving a high-quality result requires proficient sanding and polishing techniques.
To minimize or eliminate sanding marks or cloudy shadowing on the surface, LX HAUSYS recommends adhering to the following minimum standards for standard finishing:
Prior to sanding, always inspect the surface condition of the HIMACS sheets.
Vacuum the surface to remove any dirt or dust, ensuring it is clean and ready for sanding.
If there are large or deep scratches that cannot be removed through sanding, they should be repaired or re-fabricated to avoid wasted time and compromised quality.
Check the flatness of the sheets and seams. Any significant deviation should be corrected before sanding to ensure a high-quality finish.
Use the same type of sandpaper throughout all finishing stages. Mixing sandpaper types is not recommended.
Hard pads are suitable for flat and straight surfaces, while soft pads are preferable for curved areas.
Ensure the sandpaper disc is centred on the sanding pad of the sanding and polishing machine. Follow the manufacturer’s instructions for proper use.
Between each sanding stage, clean the surface using denatured alcohol and a clean white cloth. Removing dust between steps is essential for achieving optimal results.
Apply consistent pressure and overlapping strokes in both directions across HIMACS surfaces. Complete one direction before beginning the next.
Avoid excessive pressure during sanding; maintain even pressure and speed throughout.
Do not focus on a single area, especially near seams and edges, as this may cause unevenness or dips.
Regularly change or clean the sandpaper, as it will quickly become clogged.
Note:
As you progress towards a finer finish, sandpaper will clog more rapidly. If this is not managed properly, it may prevent you from achieving a consistent, high-quality gloss finish.
How to Achieve High-Gloss Finishes
Use lower speeds during both sanding and polishing.
Conduct visual inspections at each stage of the finishing process.
Employ strong lighting to highlight imperfections such as swirl marks.
Avoid disputes by thoroughly inspecting each project before final delivery.
In Case of Finishing Issues:
Use random sanding motions, such as circular or figure-eight movements, to improve surface consistency.
3.1 Uneven Seams Treatment
Levelling Uneven Seams
Uneven seams can be levelled using rigid 60 to 80 grit abrasive paper and a gear-driven orbital sander.
Attach the abrasive paper to the sanding pad of the orbital sander and set it to a standard pattern.
Carefully maintain the sanding pad flat against the surface during grinding to avoid deep scratches on the HIMACS sheets.
Do not attempt to level the seam in a single pass.
Avoid focusing solely on the seam area.
Grinding is an aggressive process; excessive grinding can cause undulations due to dipping.
Lightly grind a broader area around the seam for a few seconds, then inspect the result.
Repeat this process until the seam is evenly levelled.
.png)
3.2 Sanding Method Recommendations
Using the Correct Abrasive Paper
Always follow the recommended sanding sequence.
How to Begin:
Start the sanding process from your body position, moving from left to right (West to East).
Complete the sequence by returning to the starting point.
Begin the second sanding pass from top to bottom (North to South) across the surface.
Again, finish at the starting point.
Perform a third sanding pass diagonally across the surface, ending at the starting point.
Each sanding sequence should be repeated two to three times per grade of abrasive paper used.
.png)
Using the Correct Abrasive Paper
To achieve a consistent visual finish, operate the sanding machine slowly while maintaining a flat position. Apply continuous circular movements throughout the process. Each circular motion should overlap approximately 50% of the previously sanded line.
Example
If using a 150 mm sanding disc, ensure each pass overlaps by 75 mm.
When working near edges, do not allow the sanding pad to extend more than 30% beyond the edge, as this will reduce sanding efficiency.
.png)
4. Finish Grade
Before applying any finishing method, ensure that all sanding procedures outlined in Section 3.2 have been fully completed and that the surface has been properly cleaned.
4.1 Matt Finish
A matt finish is only recommended for light-coloured HIMACS sheets. It is not advisable for darker shades or black, as these colours are more likely to show oil or fingerprints from handling, and may also develop cloudy marks during the sanding process.
LX Hausys cannot be held responsible for any dissatisfaction resulting from the use of this finishing method on unsuitable colours.
Sanding Action | Matt Finish |
|---|---|
Step 1 | Use abrasive grit between 120 and 150 (approx. 100μ) |
Step 2 | Remove dust and thoroughly clean the surface |
Step 3 | Use abrasive grit between 180 and 240 (approx. 60μ) |
Step 4 | Remove dust and thoroughly clean the surface |
Step 5 | Use a 3M Scotch-Brite® 7447 (Brown) pad |
Step 6 | Remove dust and thoroughly clean the surface |
4.2 Satin & Semi-gloss Finish
A semi-gloss finish is the recommended standard for the fabrication of HIMACS sheets. However, it is important to note that there is no universally defined appearance for a semi-gloss finish. A satin finish may be used as an alternative where appropriate.
Sanding Action | Satin & Semi-Gloss Finish |
|---|---|
Step 1 | Use abrasive grit between 120 and 150 (approx. 100μ) |
Step 2 | Remove dust and thoroughly clean the surface |
Step 3 | Use abrasive grit between 180 and 240 (approx. 60μ) |
Step 4 | Remove dust and thoroughly clean the surface |
Step 5 | Use abrasive grit between 300 and 400 (approx. 30μ) – Satin Finish |
Step 6 | Remove dust and thoroughly clean the surface |
Step 7 | Use abrasive grit 600 (approx. 15μ) – Semi-Gloss Finish |
Step 8 | Remove dust and thoroughly clean the surface |
Step 9 | Use a 3M Scotch-Brite® 7448 (Grey) pad |
Step 10 | Remove dust and thoroughly clean the surface |
4.3 Gloss / High Gloss Finish
Gloss and high-gloss finishes are not recommended for dark or black HIMACS colours.
While these finishes can enhance the aesthetic appeal of HIMACS products, it is important to note that scratches and wear from regular use are more visible at this level of gloss. Gloss and high-gloss finishes require frequent maintenance to preserve their appearance.
LX Hausys does not recommend these finishes for areas subject to heavy use or high footfall.
Furthermore, LX Hausys cannot be held responsible for any dissatisfaction resulting from the use of these finishes on colours deemed unsuitable.
Sanding Action | Gloss Finish |
|---|---|
Step 1 | Use abrasive grit between 120 and 150 (approx. 100μ) |
Step 2 | Remove dust and thoroughly clean the surface |
Step 3 | Use abrasive grit between 180 and 240 (approx. 60μ) |
Step 4 | Remove dust and thoroughly clean the surface |
Step 5 | Use abrasive grit between 300 and 400 (approx. 30μ) |
Step 6 | Remove dust and thoroughly clean the surface |
Step 7 | Use abrasive grit 600 (approx. 15μ) |
Step 8 | Remove dust and thoroughly clean the surface |
Step 9 | Use abrasive grit between 1000 (approx. 9μ) and 3000 (approx. 5μ) |
Polished Finish (High-Gloss) | |
Step 10 | Remove dust and thoroughly clean the surface |
Step 11 | Use 3M Super Duty 2+2 White Pad with 3M Marine Paste Compound 06039 (White) or 3M Trizact 3000 |
Step 12 | Remove polishing residue and clean the surface |
Step 13 | Use 3M Super Buff (Wool) Yellow Polishing Pad with M Finishing Material 81235 (White) or Trizact 5000 |
Step 14 | Remove polishing residue and clean the surface |
Note
Various polishing pads and compounds are available on the market. The pads and compounds listed above are provided as examples. Additional high-quality pads and compounds utilising the latest chemical technologies are also commercially available.
The minimum standard for pads and compounds should be marine-grade or automotive-grade.
Please consult your supplier of polishing products and/or equipment for specific recommendations.
Most polishing compounds are not suitable for use on surfaces intended for food contact. Ensure that the finished surface is thoroughly cleaned and free from any compound residue.
Be aware that polishing generates significant heat. Apply moderate and consistent pressure while buffing to avoid overheating the surface or damaging the gloss finish.
HIMACS Colours That Require Particular Care
Category | Code | Colour |
|---|---|---|
Solids | S005 | GREY |
Solids | S103 | CONCRETE GREY |
Solids | S109 | STEEL GREY |
Lucent | S302 | OPAL |
Lucent | S303 | SAPPHIRE |
Lucent | S304 | RUBY |
Lucent | S305 | EMERALD |
Granite | G002 | GREY SAND |
Granite | G004 | WHITE QUARTZ |
Granite | G010 | BLACK PEARL |
Gravilla | GM03 | GRAVILLA MILLSTONE |
This guideline has been created to provide technical information for successful fabrication and installation of HIMACS, and it is intended to be used in a safe environment considering their own discretion and risk by who has technical skill for fabrication and installation of HIMACS.
This guideline is continually revised to provide reliable and up-to-date information, replacing all previous versions of the guideline and technical information, however the usage and conditions of use are beyond LX Hausys control, LX Hausys cannot guarantee the suitability of material, fabrication and installation for all usage and conditions of use. Users should not regard or rely on this guideline as a complete, sole, up-to-date or absolute information. HIMACS users, fabricator and installer should review whether the design for HIMACS, fabrication method, installation method and required performance are suitable for the intended use and conditions of use. LX Hausys shall not be liable for any direct or indirect, commercial damages or losses caused by the fabrication and installation results of HIMACS using any or all these guidelines. In addition, the results of joining with other materials, and the fabrication and installation guidelines for other materials shall not be covered by LX Hausys.
This guideline does not encourage to violate any laws, patents and licenses, and cannot be used as a basis for legal liability. All works on / from HIMACS must be performed in accordance with related laws and regulations.
LX Hausys reserves the right to change the technical information and disclaimers in this guideline for technical development and further information, and the use of HIMACS or this guideline is considered to accommodate the information and changes provided in this guideline. Therefore, please check the changed details of this guideline from time to time.
LX Hausys reserves all information in this material, and no reproduction or alteration is permitted in any way for all or any part of the information without the official written permission of LX Hausys.